A Little Taste of Everything!

THE RECIPE OF HAPPINESS!

Monthly Top Posts

Showing posts with label Tabs Art Shop. Show all posts

Thursday, July 3, 2025

July Challenges begin on Twisted Thursdays


July Twisted Thursday Challenges begin at The Outlawz Challenges! 

Twisted Thursdays are always Anything Goes with an Optional Twist. 


Come join us and share your creations at

https://theoutlawzchallenges-thursday.blogspot.com/


Cat sticker by


https://tabsartshop.com


Tuesday, July 1, 2025

July Tuesday Color Challenges begin at The Outlawz Challenges


Color me beautiful in July at The Outlawz Tuesdays Color challenge! 


 Come join us at


Anti- Social sticker at 

Thursday, September 5, 2024

The Outlawz Twisted Thursdays in September


Hello again my friends & followers!

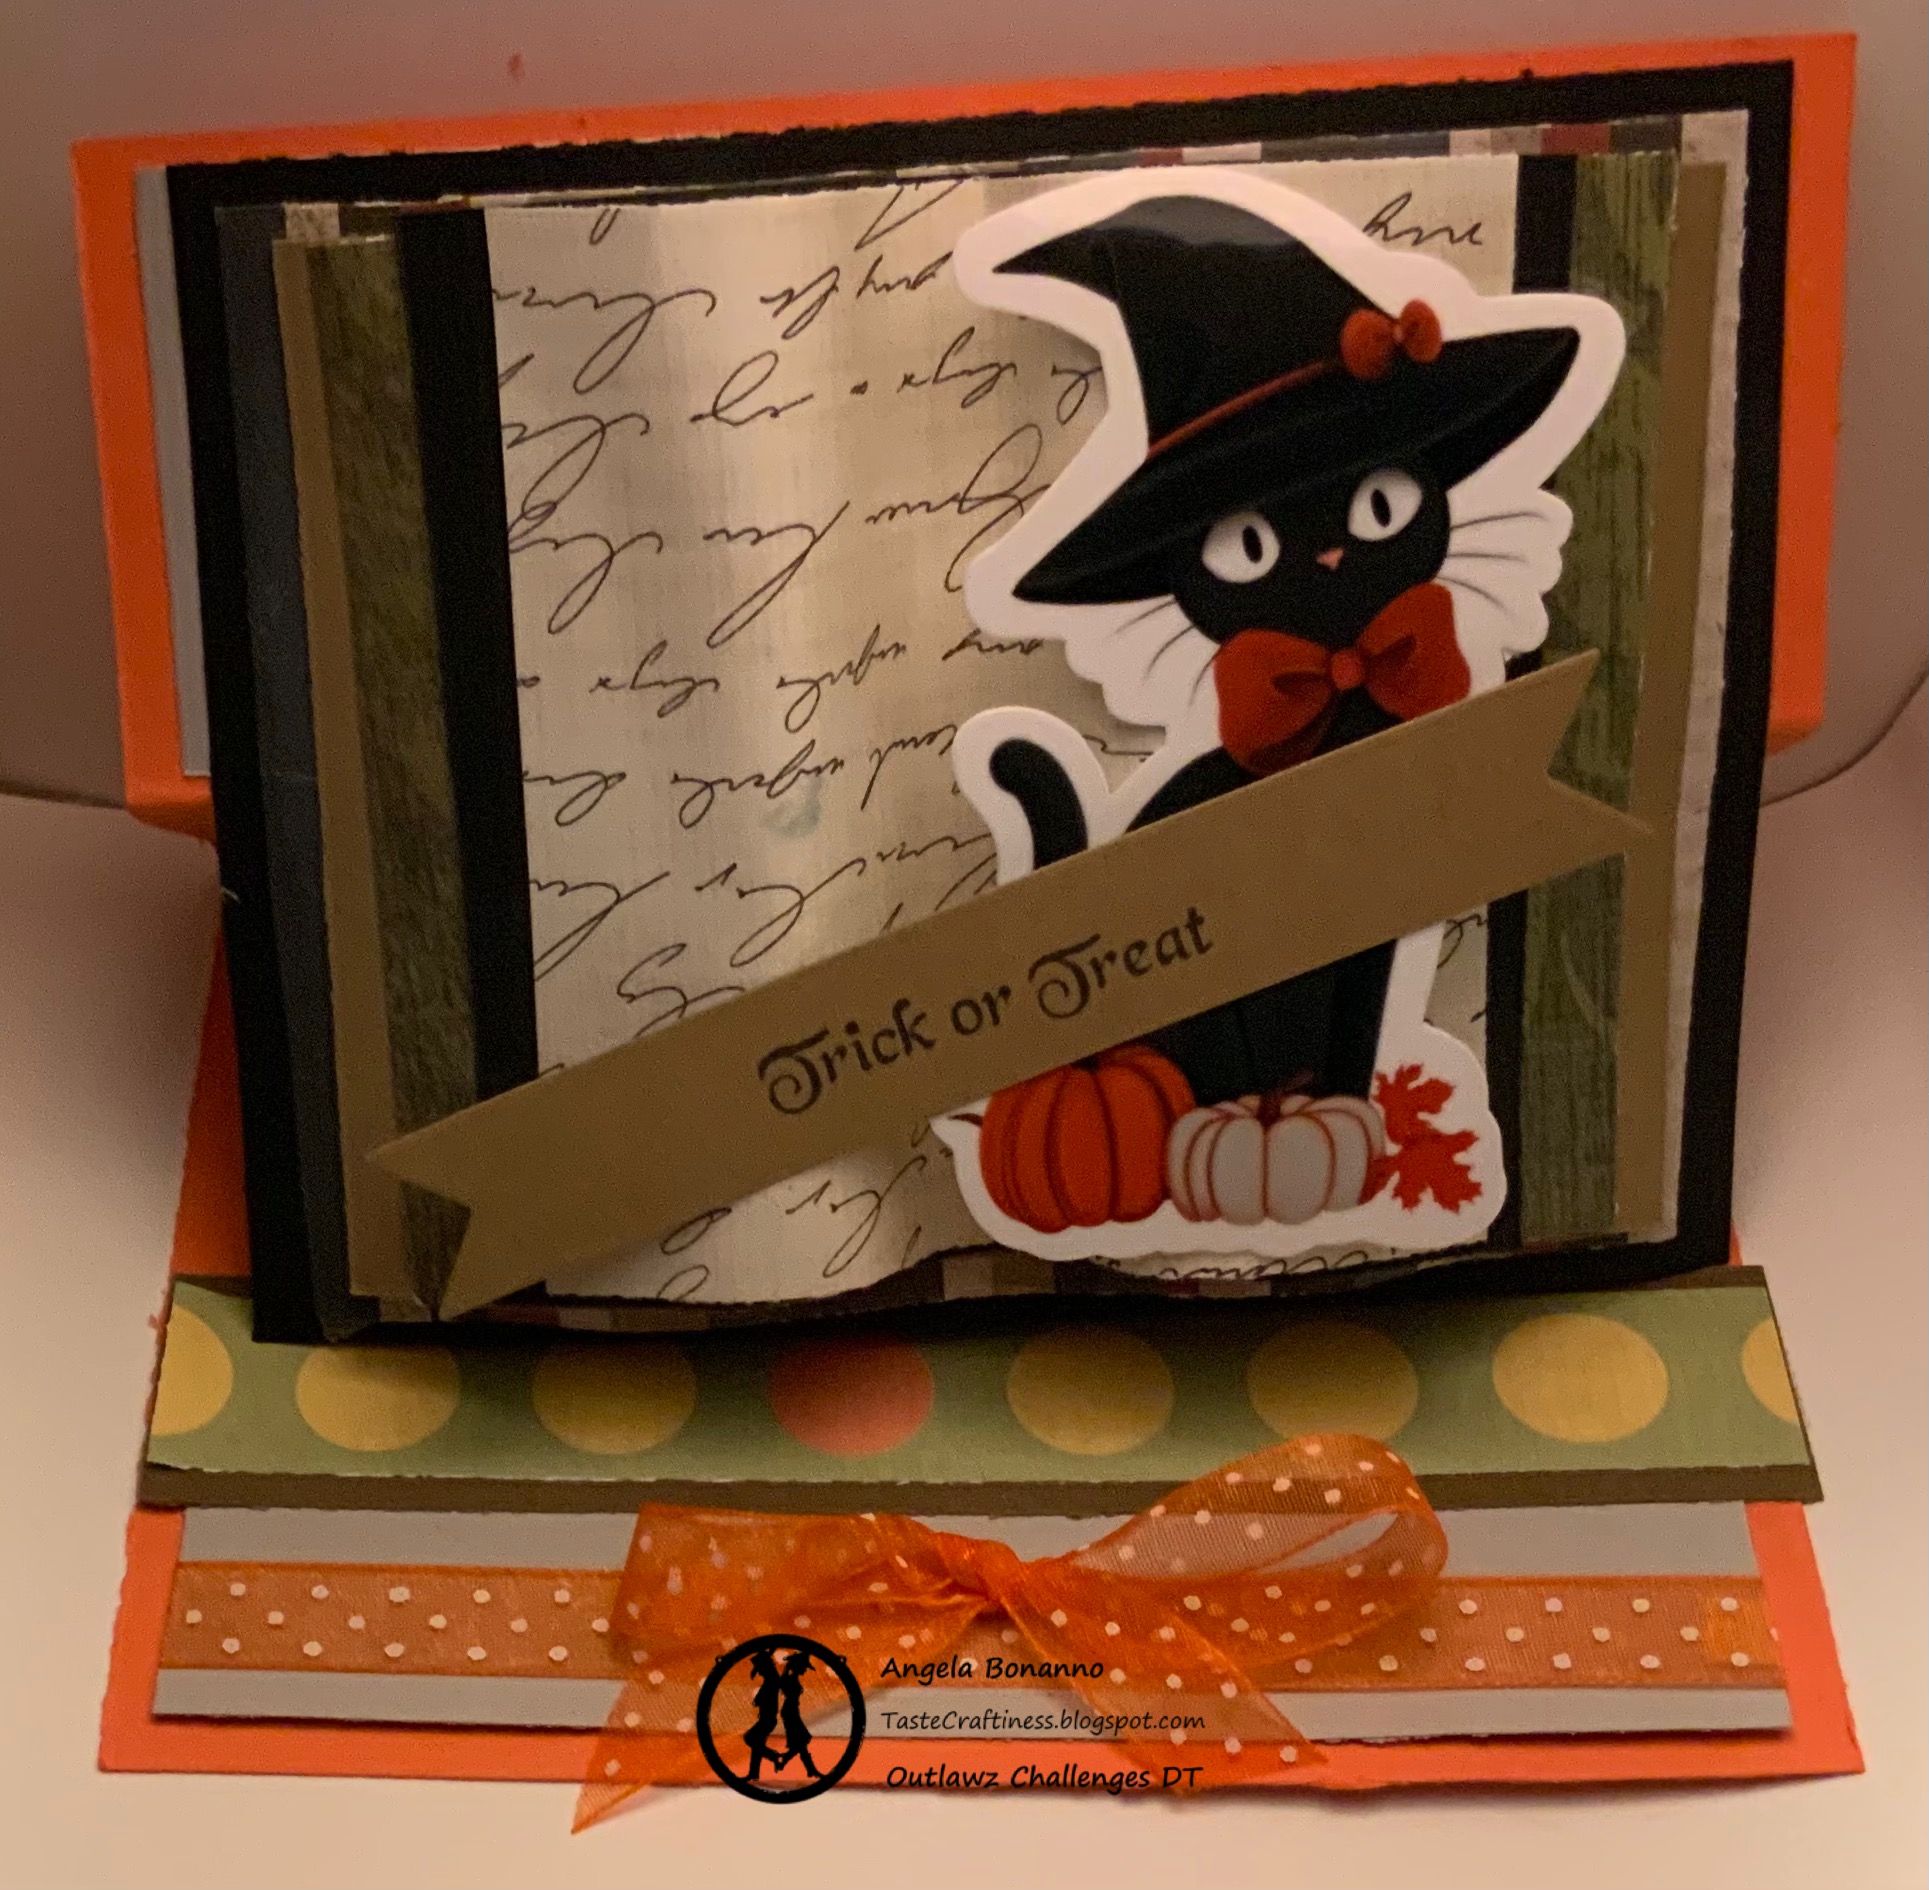
It is time to kick off September Twisted Thursdays Challenges,

 where it is always Anything Goes with a fun but optional twist! 

The twist this month is “Book It”! 

For my card I decided on the book easel.


 I used a sentiment stamp from Anita Be Stampin called Broomhilda. The cat image you can find at a new upcoming digi artist Tabs ArtShop this is a sticker.


We would love for you to join us for some fun at

https://theoutlawzchallenges-thursday.blogspot.com/2024/09/twisted-thursdays-september-5-october-2.html?m=1

Tuesday, May 7, 2024

May Challenges Starting on Tuesdays Color Challenge at The Outlawz!


Hello friends and followers! 

The Tuesday Color Challenge at The Outlawz Challenges starts today! SO be sure and come share your creations with us for a chance to win fantastic prizes and recognition for your  work and design! Join us at the Tuesday Color Challenge 


Today I am sharing this simple card using an image from someone very special and dear to me.  This cute digi kitty image made into a sticker  is from TabsArtShop! You can find her shop here   


 She has bookmarks, stickers, sweatshirts, pins, etc. check out her cute shop! She is an amazing artist! Even if I am a bit partial since Tabitha is my daughter. ;)


Wednesday, June 8, 2022

Recessed Panel


Howdy my friends and followers! 
Today I am sharing this adorable BUZZY image from this months wonderful sponsor

WINKWINKINK


https://www.etsy.com/shop/WinkWinkInk 

 https://www.zazzle.com/store/winkwinkink

https://www.pinterest.com/winkwinkink/_created/

https://www.instagram.com/wink_wink_ink/

We have combined all of Junes challenges into the first two weeks of June. You have from June 2nd to the 15th to upload any cards to www.outlawzchallenges.ning.com for a chance to win a prize from this months sponsor. 

The final challenges at the NING site will be ANYTHING GOES for everyone joining! 

Wednesday, April 6, 2022

Hippity Hoppity


Hello again my friends! 

Today using the tutorial I posted two days ago, I am sharing this card. For my card I used these great egg and sentiment images from Shellys Images. You could find Shellys Images at


https://shellysimagesblog.blogspot.com/2012/06/tutorialtechnique-tuesday.html


But it looks like her shop is now closed down.

 I added in some egg stickers through out, and the adorable Gnome and flower sticker on the sentiment are from my daughter’s shop on Etsy. It is called Tabs Art Shop. She has stationary and many different sticker designs she designs and prints herself. This is the side view of my card popped up.


I didn’t leave the back unfinished. I added my name stamp as well as this cute little chickadee coming out of the egg from Tabs Art shop. It is from the sticker pack shown below.


You can find Tabs Art shop at


TabsArtShop's shop on Etsy https://www.etsy.com/shop/TabsArtShop


Tabitha is adding more images all of the time! So be sure to check out her shop! 

And here is what the back of my card looks like. 


You can find Tabs Art shop at

TabsArtShop's shop on Etsy https://www.etsy.com/shop/TabsArtShop

I entered this card in the Anything Goes challenge at


I entered this card in the Easter/Spring Challenge at


I entered this in the Anything Goes Challenge at


I entered the Anything Goes Challenge at


I entered my card in the Spring Colors Challenge at


Sunday, April 3, 2022

Pop Up Front Step Panel Card Instructions


Let’s Begin!

You will need to cut the main base of your card in whatever color you choose. For my card I just grabbed some scraps to do a dry run of the card fold and had planned on finding papers I want to use later, but I ended up liking how my card turned out so I decided to make another and show you how it is done from my perspective! 

Card Stock Cut:

Main 4 1/4 x 11

Card Front Base 5 5/8 x 3

Design Papers Cut:

Card Front Base 5 5/8 x 2 3/4

Top of Main 3 3/8 x 4

Bottom of Main 1 3/4 x 4

Middle of Main 1 x 4


Now let’s do some scoring on three of these pieces. 
We will score the Main card base, the card front base and the card front design paper as follows.
Using your 4 1/4 x 11 piece score at these measurements. 
5 1/2, 6 3/4, 8 3/4, and 10
See photo below

Using your 3 x 5 5/8 piece of card base score at these measurements
3/8 & 1 5/8
See photo below

Using your 5 5/8 x 2 3/4 piece of design paper score at these measurements
3/8 & 1 5/8
See Photo below

Now for the fun part!
Before we move to the next step. I wanted to let you know now is the time to stamp the back of your card with your signature before folding and sticking into place. Be sure it is on the opposite side of the direction of your folds from scoring. 
See Photo below


Let’s fold the score lines in the same direction on the Main card stock and you will roll the folds into a coil of sorts so that the bottom flap will be attaching to the main part of the card.
 See photo below

Once attached it will look like this!

Now that we have the main body of our card lets work on the card base by attaching our scored design paper to the card base. Fold in same direction on the score line.  Be sure to line up the score lines on both sheets when attaching together.  As a side note: Now that I am at this step it may have been easier to attach these pieces together and then score them.  
See Photo Below


Now we need to add the Main piece of designer paper to the back of the main piece of card stock.
See photo below 

Continue adding the other design papers
See Photo Below


Now we will attach the scored card base to the main card base making sure they fold nicely together and flat. 
See Photo Below


Now we will attach the scored card base to the main card base making sure they fold nicely together and flat. I line up the bottom while it is flattened and then just stick it down, when you open it back to stand it will all line up nicely.
See Photo Below


Now the final step before decorating is to stick that last piece down that is poking up in the air on my piece. You don’t want to double sticky the entire back just the part that will be attached to the base of the card. 
See Photo Below


It will flatten like shown. 
See Photo Below

Once it is standing, you can see your signature on the back as shown below. 


Now that we have our standing card base complete. We can add on embellishments, and images. For my card I wanted to use up some of these images I over printed to rid myself of this recipe box full of printed images. One of the images I am using is from NanVics Digitals, it was given as a freebie at a website no longer running called Crafters Digital Art Center or known to most of us as CDAC. You can find NanaVics at


  The adorable Bunny with Glasses is from Gerda Steiner Designs. I liked him a bunch apparently since I printed out more than enough copies of him. You can find Gerda Steiner Designs at


I colored both images using Copic markers. NanVics egg basket image was colored up when I first started using Copics back in like 2011, so I just added on some highlights. For my bunny I added glitter Stickles glitter to his glasses to give it some whimsy. 

Aren’t these stickers so cute!!

The sentiment came from my daughters shop, you can find her on Etsy at Tabs Art Shop. She draws all of her own images and turns them into stationary and stickers. I added some sticker eggs around my card as well. You can find Tabs Art Shop at


TabsArtShop's shop on Etsy https://www.etsy.com/shop/TabsArtShop


Tabitha is adding more images all of the time! So be sure to check out her shop! 


Thank you for stopping by to see my tutorial. I hope you will make this card shape for your creations! 


Have a wonderful and blessed Easter Holiday! 

I entered this card in the Anything Goes with a Critter Challenge at


I entered this in the Anything Goes Challenge at


I entered this card in the Anything Goes Challenge at


I entered this in the Anything Goes Challenge at


I entered this card in the Anything Goes Challenge at


Sunday, February 27, 2022

Bee Yourself!


Hey there I am just buzzing in to share this fabulous card using the wonderful hexagon pattern image from Varada Sharma that I received from winning a challenge at the Inspiration Station Challenge. 


I knew just how I wanted to use this image. I have these adorable “Bee” stickers I bought from Tabs Art Shop on Etsy.


TabsArtShop's shop on Etsy https://www.etsy.com/shop/TabsArtShop

 I added the two little bees on the corners and the plump one right near the middle. I could not leave the inside of the card out so I added this adorable bee with a heart design trailing behind on the inside corner of the card. 

I entered the challenge at

I entered my card in the challenge at


I entered the challenge at


Although I know I wont be eligible for a prize since I did not use their image I entered the challenge at


I entered the challenge at


I entered in the challenge at