A Little Taste of Everything!
THE RECIPE OF HAPPINESS!
Monthly Top Posts
-
Today I created this card for the Copic Challenge at The Outlawz !! Come join the fun here !
-
Digi at Digistamps For Joy Digistamps For Joy has another fun image and challenge for you! This week the theme is All The Leaves Are ...
-
Have I mentioned how much I am loving my Silhouette Cameo? This is one of the designs at the Silhouette store. I decided to use this card...
Wednesday, December 28, 2011
Monday, December 26, 2011
Anything Goes Greetings Cards
I hope everyone had a very happy holiday yesterday! We made it easy for you this week in the Greetings Challenges at The Outlawz! Come play... Anything Goes!
Saturday, December 24, 2011
Photo Tile Coasters

First print out pictures on tissue paper using painters tape to hold the tissue paper to a regular sheet of printer paper.

Cut the tissue paper pictures out and modpodge the tile then lay the tissue paper down and modpodge the top, do not put to much glue on it will cause the ink on tissue paper to run more. A thin layer of the mod podge, let dry about 20 minutes and place on two more coats allowing to dry in between. Once it has dried. You will need to seal with a Clear Acrylic water proof sealer. Allow 72 hours to cure. You did it!
You will see behind this card I wrapped the tiles in floral fabric that I had on stash from flowers I have received in the past and this home made project is ready to give to family and friends!
Monday, December 19, 2011
Just Bling It!
This week we have a wonderful challenge for you at The Outlawz! We want you to break out the bling on some Greeting Cards! On my card I used Anne Fentons Santa image and a message that I had found in the Freebies section of The Outlawz!
Wednesday, December 14, 2011
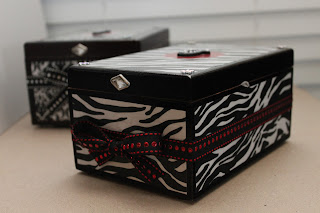
Cigar Box Make-Over

First I cover the top and sides with scrapbook paper.
Next I added a little slight touches of my daughter's favorite color..pink.
With the tools above and a few rhinestone embellishments this was an easy fun project to give my teenaged daughter.
Tuesday, December 13, 2011
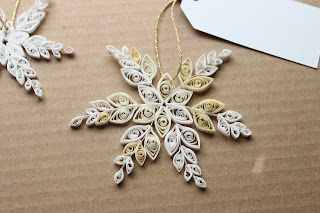
Making of a Quilled Snowflake

Tools: Quilling tool or toothpick, tweezers, template is nice to have, glue, and quilling paper strips
First Step: Using your quilling tool whether it is a toothpick, a slotted tool or not you will spin your strip of quilling paper into a circle and make it the 3rd circle from smallest to largest on your template tool. Shown in photo above, note the circle holes. You will make 18 of this size and after gluing the end down to close the circle you will pinch it on both sides forming what is called a marquise. You start the snowflake by gluing six of the marquise together as shown in photo above.
Second Step: Glue 1 inch strips or little longer can always trim down later. Glue in between marquise shown above.
Third Step: Glue in pairs on the strips till you have used all of the largest sized marquise.
Should look like photo above.
Fourth Step: Make 12 circles in the 2nd circle from smallest to largest on your template tool. Pinch into marquise shapes. Attach these 12 shapes around in pairs on the strips. Should look like photo below.
Fifth Step: Make 18 of the smallest circle on your template tool. Pinch into marquise shapes. Attach 12 in pairs on strips. Trim the tails if needed and attach remaining 6 marquise onto ends when dry shape as needed.
Monday, December 12, 2011
Let It Snow!
Let it Snow at The Outlawz! Come join us for Letting it snow in the Greetings Challenges! Hope to see you there!
This card was made by my 17 year old daughter mostly. I guided her in where to place to things and the added snowballs, but for the most part this is her creation. ;) She's a natural!
This card was made by my 17 year old daughter mostly. I guided her in where to place to things and the added snowballs, but for the most part this is her creation. ;) She's a natural!
Friday, December 9, 2011
Twisted Thursdays Challenge
What a super fun challenge at The Outlawz Twisted Thursdays! For my ornament I quilled snowflakes. I searched the internet for the perfect snowflake poem and found a unique poem from Emily Wilburton. I chose to print the poem out and attach it to the tags of the snowflakes. On the back of the tag is says that this snowflake was made by me! :D I love how they turned out. It was a perfect craft to do while watching movies with the family, with the exception of the lights were so dim I thought I was using all white paper to quill but oh well, it is definitely a one of a kind snowflake!
Each of us are a snowflake
not two of us the same.
Reflections of the endless loving
source from which we came.
Unique in form and beauty
Crystallized at birth.
Little flecks of heaven
born to melt into the earth.
We are each of us a snowflake
of infinite design.
Transitory dancers
on the window panes of time.
Unique in form and beauty
No two of us the same.
Reflections of the endless loving
source from which we came.
We are each of us a snowflake
a falling star in flight.
A traveler through the universe
in search of our own light.
Unique in form and beauty
No two of one design.
Transitory dancers
on the window pane of time.
Thursday, December 8, 2011
Color Challenge!
Love these colors from The Outlawz Color Challenge! You must go play! Beautiful inspirational cards to see!
For my card I used my first ever Quilled Snowflake ornament. Isn't it cute! I hope who ever receives this card loves it as much as I do!
Wednesday, December 7, 2011
Anysoldier Winter Swap Cards Returned
Here they are the cards I received back from the Anysoldier.com card swap team! Aren't they awesome! Look at those snowflakes Trudy crocheted! WOW! Some amazing people with some great talent in this group. So proud to be swapping cards to send to the soldiers with all of them!
Tuesday, December 6, 2011
CFC Challenge at The Outlawz 3
Your missing out on some wonderful digis from Sandi and Anne over at The Outlawz! Here's the two cards I created last week with a couple of the images given in the CFC Challenge!
Monday, December 5, 2011
Tall Glass of New Years
It's Monday and Chana on the Greetings Team at The Outlawz has posted our newest challenge for you! Please come share your cards with us and get in your chance for free prizes!
Subscribe to:
Comments (Atom)


